Dawn
For any of you that know me personally, you know I work with a bunch of guys who really do not get my infatuation with Instagram.  That's okay.  I don't get their fascination with boobs or Starcraft, so I guess we're even.  What I have heard them say is why would you want to take a perfectly good photo and make it look old, dirty, and blurry?  What is the point to that?
My view of Times Square

As a species we enhance things all the time.  Just using drawing as an example we went from cave drawings to paper drawings that suffered from a lack of perspective.  Then, along came Filippo Brunelleschi in the early 1400's and poof we have linear perspective.  Since then it's been built on by others and now we have some amazing 3D CGI to show for our enhancements.
Market Street bridge
at sunset

Getting back to Instagram though, the popularity is driven by a number of things.  One is nostalgia, the viewer may recall the days of Polaroids and black and white film, or just like the feel of being a part of a different era.  Another is the ability to move the viewer away from reality.  Depending on the filter applied, or the blur and how much of it there is, the image can become very abstract requiring imagination from the viewer to give it a meaning.  Lastly it's a way for the viewer to connect with the image, or the photographer in feelings, memories, or even experiences that the photo is depicting as well as share their own photos with others to do the same.
Carlisle, PA mural of Molly Pitcher

Instagram isn't for everyone, and that's okay.  Turns out I'm still not a fan of boobs or Starcraft and that doesn't make me a bad person either.  And to answer their question of why do I want to do that to my perfectly good photos: by running it through those blurry, dirty filters, I've made that image mine.  It means something to me and I want to share it with others so they can enjoy what I see in it.

If you'd like to see more of my Instagram photos, you can look me up (drsizer), or the last few are always on the widget here on my site.

These are my favorite photos I've enhanced with Instagram so far.  The first is a vacation photo, the second is just from my drive home, and the last is a bit of home for me.  That caboose has been a fixture of the town I grew up in for as long as I can recall.

Boldt Castle Power House
Yellow Breeches Creek

New Oxford, PA Train Station


Dawn
Who knew a fashion post could be (in part) about autism?  Bet you didn't!  Well, my lovelies, today it is.  It's also about one of my favorite things, SHOES!

Autism has some of the craziest signs for a disorder, ever.  One of them happens to be toe walking, which, if you have a toddler is a common thing.  Toddlers will toe walk, slap their feet down flat or roll their foot like an adult as they learn to get themselves ambulatory.  For some people with autism, it's a learned skill to not walk on their toes.  Minion #1 is one of those people.  We still work on that skill, especially if he's getting tired.  As with everything else, as your  mind and body tire, the brain relaxes and things you have to think about doing go to the wayside.

As you can also imagine, it takes a toll on his shoes.  The wear patterns are different on his long toed, narrow feet.  The treads on the fronts and sides are worn down long before the rest of the shoe.  When he was younger, due to the shuffling and scuffing, the treads would come away from the shoe as well.  We tried a number of things to address the walking issues he had.  We went from constant reminders, showing him again and again how we walked to letting him go barefoot.  Nothing really worked.  Until flip flops.  Turns out toe walking in those makes you trip over your own feet.  After a summer or so of that, the issue resolved itself, minus a few small reminders now and then when he's tired.

We women also do a good bit of toe walking if we wear heels a lot.  It's a bit different in that the foot is forced into that position, but it does the same things.  There are a number of issues that can crop up from wearing heels, from bunions to stress fractures of the foot.  So, if you love your heels like I do, here are a few tips to keep your feet feeling awesome.

* When you buy shoes, make sure they fit your foot.  Not all shoes from all makers in your size will.
Clarks are a great shoe.  They don't fit my foot though.  My go to heels are from Aldo and Easy Spirit for flats.  I don't even feel them on my foot.

* Pad your shoes so you're always comfortable.  They make inserts for just that reason.
There are inserts for the balls of your feet, sides, heels...etc.

* Own more than two pair of shoes, guys.
If you wear the same shoes over and over before they have a chance to dry out, you'll end up with some rank smelling shoes from the bacteria that's breeding in there.  Freezing them for longer than 24 hours will kill the bacteria.

* Pedicures - do them yourself if you like.  It keeps the blisters, calluses and cracked feet to a bare minimum.

* If you're not great with heels, but still want to wear them, try a lower wide heel, or a wedge.  There are plenty of styles out there that don't look like your grandmas shoes.


Also, here is today's outfit

Fall tans


Dawn
Last Thursday was back to school night at the middle school.  Minion #1 who attends this school is in a special autism class for some of his day, and back to school night is usually a great way to introduce ourselves to his teachers, get their impressions and give them ideas if they are having trouble teaching him.  Usually, is the word though we want to stress here, because this year, as we've found out teaching isn't really what they are doing.  For those of you just tuning in, feel free to read a few other posts about our local school district and how we've had to file complaints for not following the IEP as well as contact the Attorney General's office to report them for medicaid fraud.

After speaking to his history teacher, it was his opinion that he simply change all the tests to things that he could pass without really having to work at understanding the material.  If he could just know names and dates, and that was good enough, and the best part is that he would gets A's too!  The science teacher informed us that he was only rehashing material from the two previous years, and that would be a struggle for him, since he wasn't sure how you could rehash the material and make it seem new.  Oh, and science class, wouldn't really be 'class' it was really more an online thing and they would do a project or something too.


I'm not entirely sure, but I think the King's brain may have imploded at that point.  The incredulous looks he was giving me coupled with the opening and closing of his mouth, rather like a stunned trout, while trying to form angry words was giving it away.  Whatever, it was time to go home.

We found out a number of other things that evening as well.  One was that the autism program that the school started is failing miserably and won't be continued at the high school level.  Another was that there still aren't any other students that are high functioning autistics, so minion #1's getting pretty far behind in his own studies due to the other kids not progressing.  My personal favorite though was that the school is simply neglecting to provide speech services this year, contrary to the IEP and the settlement reached (not monetary)  with the department of ed. over the summer.  So, I'll have to start filing complaints, again.

As parents, I think we all find faults with the public school system.  From teachers that care too little to bad food that's offered in the cafeterias at lunch time and all things between.  At this point though, we've reached our limits of what's acceptable.  We're looking into cyber school.  Which, while still public school it gives us the opportunity to be more involved and interact with our minions throughout the day while not being responsible for developing a curriculum.  With any luck this will allow them to achieve their potential instead of just whatever the school thinks they need to squeak by.

Has anyone else run into this sort of thing?  What did you decide to do?
If any of you have decided on cyber school what has your experience been like?

Labels: , 1 comments | |
Dawn
When we left off with part 1 of this tutorial, we had just cut out our materials and were getting ready to sew.  This week, I'll show you how to make the casing for the piping, sew it to the chair pad, make the ties, sew both sides together and stuff the cushion.  I swear it's not as hard as it sounds.

Taking the strip of 2" wide fabric, measure around your cushion and give yourself an extra 2".  This will be our casing for the piping.  Cut a length of piping the same length.  Wrap the piping in the fabric, wrong sides together and pin so that the fabric is tight to the piping.

Keep the edge of your presser foot on the piping
to ensure a tight casing.
Once you have the piping done, pin it to one piece of your cushion.  You'll be pinning the casing towards the middle of the cushion and right side up.  I found that using the pins at the sewing line in the casing worked well and kept the fabric taut.  Sew the piping to the cushion on the same seam line as before.  Again, if you keep the left side of your presser foot on the piping, you should be sewing on the same line as before.  Seam allowance here is about 1/2".  

Sew the casing to the cushion, tucking one
end inside the other casing for a neat edge.
Next we're going to double check the shape and size of our cushion on the seat we'll be putting it on.  Don't worry if it seems just a bit big right now, that's a good thing.

Yes, my butt shall look good on you!
While you're admiring your handy work, plug your iron in and wait for it to heat up.  We're going to create the ties for our cushion next.  Take the lengths for your ties and fold them like below, then iron them.

How cute, my nails match my ironing board pad!
Fold your tie in half and iron it again.  Use pins to hold the ties together.

I pinned the edges due to my fabric being so thick.

Now you're going to sew the ties.  Stitch the open edge together using a straight stitch, giving yourself about a 1/8" seam allowance.  If you want to get fancy, fold one end in and sew it closed as well to finish it.
Either tuck the ends in and sew those
closed, or zig zag the ends.

Laying your cushion back on the chair, figure out where you want your ties and pin them there.  I have mine pinned to the casing, on the wrong side of the fabric with the finished ends of the ties out around my chair not pinned to the casing.

If you want, baste the ties to the casing.

Get the second piece of your cushion, we're going to start the process of putting them together.  Pulling the piping and ties to the inside, with the right sides of your fabric together start pinning.  Again, you'll see I'm pinning at the seam where the piping is.  You're going to want to sew on that line.

It was this point of the project that I was dreading.  The fabric I have is really thick and 4 pieces of it was too thick to go under the presser foot of my machine.  I know some of you are snickering now, but I really had no idea.  The thing I really had no idea of was that the catch for the presser foot lifts up more than I knew(in my defense it was nearly jammed from never having been used).  I discovered this today while looking at new machines, and figured I'd come home and check mine before buying a new one.  As I was all excited about this amazing discovery, minion #2 comes in and asks if the king had to show me how it worked.  My bubble of happy quickly popped as I answered with 'thank God no, he didn't.'  I'd have never heard the end of RTFM.  Even after 10 years of sewing projects, you can learn something new!

Take your time pinning and sewing this, if you
don't the piping will look messy.

Start sewing just before the first set of ties
 end just after the second set.
As I was sewing my cushion together I met up with Murphy, from his law.  He explained to me that since I was nearly finished with this project and my cushions were looking FABULOUS, he should give me a hand.  As a side note, always make sure you're using the right type of needle for your fabric.  Usually it will prevent things like this from happening.

One broken needle.  :(

Do not sew the entire cushion together!  I left the area between the ties open to put my stuffing in.  Depending on what type of filler you use, polyfill or an actual cushion, the hole size you need will vary.  In my case, I'm using the filling from some old bed pillows.  I took the cases off the pillows and using my template cut the foamy inside to size.

Handy dandy template - trace with sharpie

Sharpen your scissors before attempting this!
With the cushion still inside out, if you have rounded edges, you should clip them.  When you do, make sure you do not cut through your seams, or you'll be sewing again.

Clipped edges at the corners.

Turn your fabric to the right side.  You should now have a nice, nearly finished cushion with one hole towards the back where you will stuff it.  Before you do that though, put your hand inside and draw a finger along the seams to ease them and the rounded edges out.  Your piping should be nice and neat, laying flat if you eased the seams out enough.

Look at my pretty piping!

Once you have your cushion almost sewn together, and your filling ready, stuff your cushion.  I rolled mine up as tight as I could, and with the help of the king's man hands wrangled it into the cushion.  It was easy enough to then unroll it inside the cushion and push it into all the nooks and crannies.  When you're satisfied with the way the stuffing is, you can hand sew the hole closed with a slip stitch by hand, or top stitch it if you don't mind seeing the seam.

Ignore the pins at the back.  I have to get
a new needle to finish it.
Once I have the back closed up properly, I'll be putting two buttons on each of my cushions so it looks like eyes, staring at your butt while you sit on it, I mean, to hold the foamy insides where they are.  I chose silver decorative ones and they'll go the whole way through the cushion and attach to small white shirt buttons on the other side.  If you only use thread and knots, there is the chance that it will tear the fabric, or pull back through.  By using another button, the chances of Murphy showing up and explaining that to you are slim.

My total cost for 4 cushions with this project, not counting the broken needle was $9.64.  Not too shabby considering the other things I looked at were $40 a piece.

I hope you enjoy your cushions as much as I do!

Dawn
Today is Six Places and anytime I think about going anyplace I think about Dr. Seuss

You have brains in your head.
You have feet in your shoes.
You can steer yourself 
any direction you choose.
You're on your own. And you know what you know.
And YOU are the guy who'll decide where to go.
Oh,The Places You'll Go! ~Dr. Seuss


1).  Home is the place where, when you have to go there, they have to take you in. - Robert Frost
I don't know about the rest of you, but mom and dad's place is really still home when I think about it.


The backside of the house I grew up in.
2).  Love begins at home, and it is not how much we do... but how much love we put in that action. - Mother Theresa
My own house, which is slowly becoming home as we remodel, make memories and watch the minions grow up there.
Formal Dining Room set with my Grandmother's China and my crystal.

3).  Washington, DC is to lying what Wisconsin is to cheese. - Dennis Miller
I love D.C.  There is so much to see and do there, from museums and art to little hole in the wall eateries and people watching.
Washington Monument, before the earthquake.
4).  "I need a vacation to recover from my vacation" - said everyone, always.
Your last vacation is always one of your favorite places.  The memory is fresh and chances are you did at least one thing that was a lot of fun.

Mount your whales, we ride at dawn!
Deep Creek Lake, MD
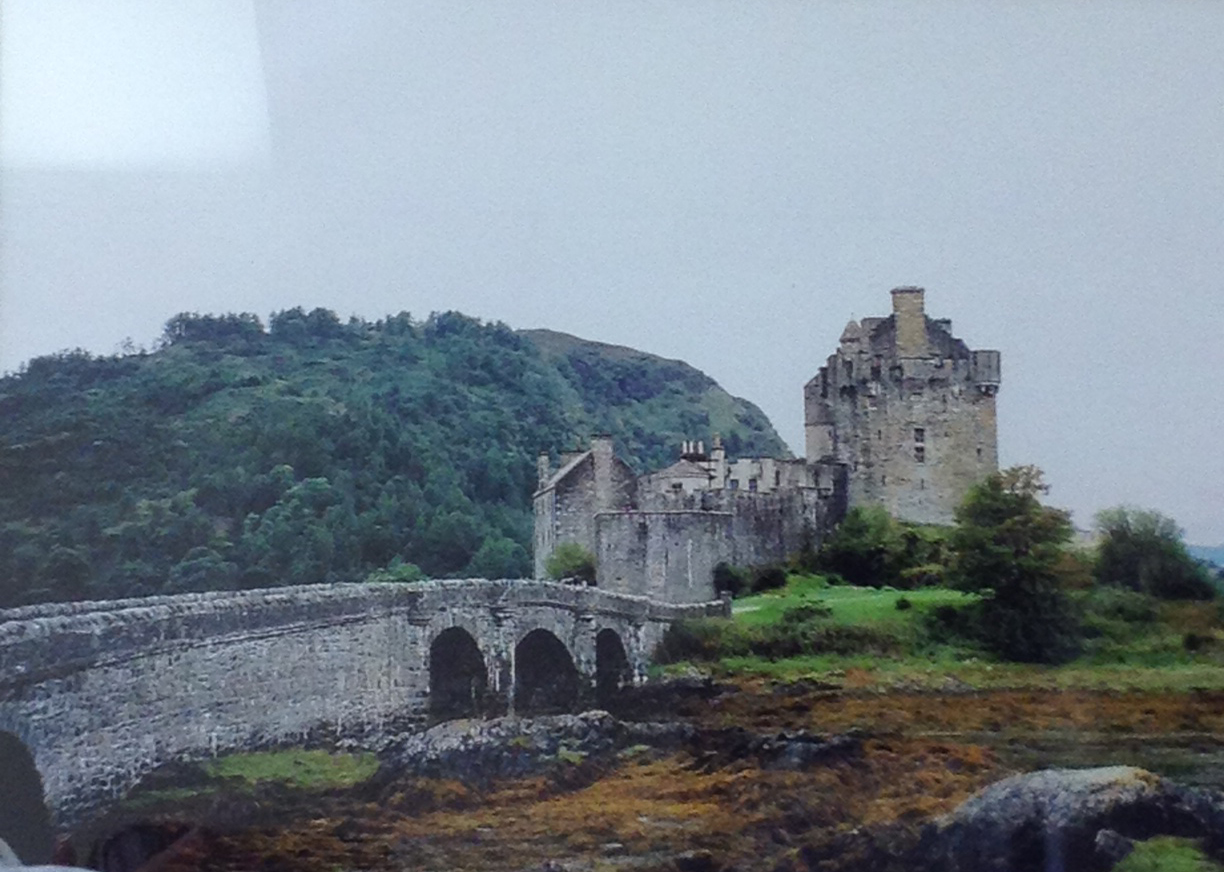
5).  There's a lot of fantasy about what Scotland is. - Sean Connery
Out of all the places I've been, it's by far one of my favorite.  There's a certain wildness and peace to the entire country.  The people are lovely, the food is horrendous (or good if you're smart enough to get what I did) and every day is a new adventure.

Eilean Donan - there was a drought the year I was there.
Hence the lack of water.

6).  Yes, we’ll gather at the river, The beautiful, the beautiful river; Gather with the saints at the river, That flows by the throne of God. - Robert Lowry
I know I covered Scotland as a whole, but until you've seen Inverness, you've really not seen Scotland.  Its considered a city because of the cathedral, yet the size of a small town.

Cathedral Church of St. Andrew along the River Ness,
taken from Inverness Castle.


These are my places.  The places I most want to be, or the places I think of most often.  
What places do you think about?